 |
PIAS Manual
2025
Program for the Integral Approach of Shipdesign
|
 |
PIAS Manual
2025
Program for the Integral Approach of Shipdesign
|
In Codemeter an introduction is given to the Codemeter software protection. This chapter discusses its installation and update procedure.
PIAS is protected by means of a licensing mechanism using Codemeter dongles from Wibu-systems (=hardware lock). The dongle can be used directly in a local PC, or in a PC in the network/LAN (server) and the licenses are available to all computers which are part of this LAN (clients). A driver is required, to enable communication between (the installed) PIAS software and the dongle. The installation of this driver is described below:
Licences can be remotely switched on, off or added by SARC (temporarily). This mechanism works as follows: A PIAS user first creates a license requests file. The user then sends this file (by email) to SARC. SARC uses this request file to create a license update file and returns it (by email) to the PIAS user. This file allows the user to update the licenses. The exact procedure is described below:
The current set-up of licenses allows users to freely choose which modules are needed and which are not. However, if several licenses are available but only 1 license of some modules is available, it may happen that it is in use. SARC has done their best to avoid this as much as possible, but sometimes there is no other way.
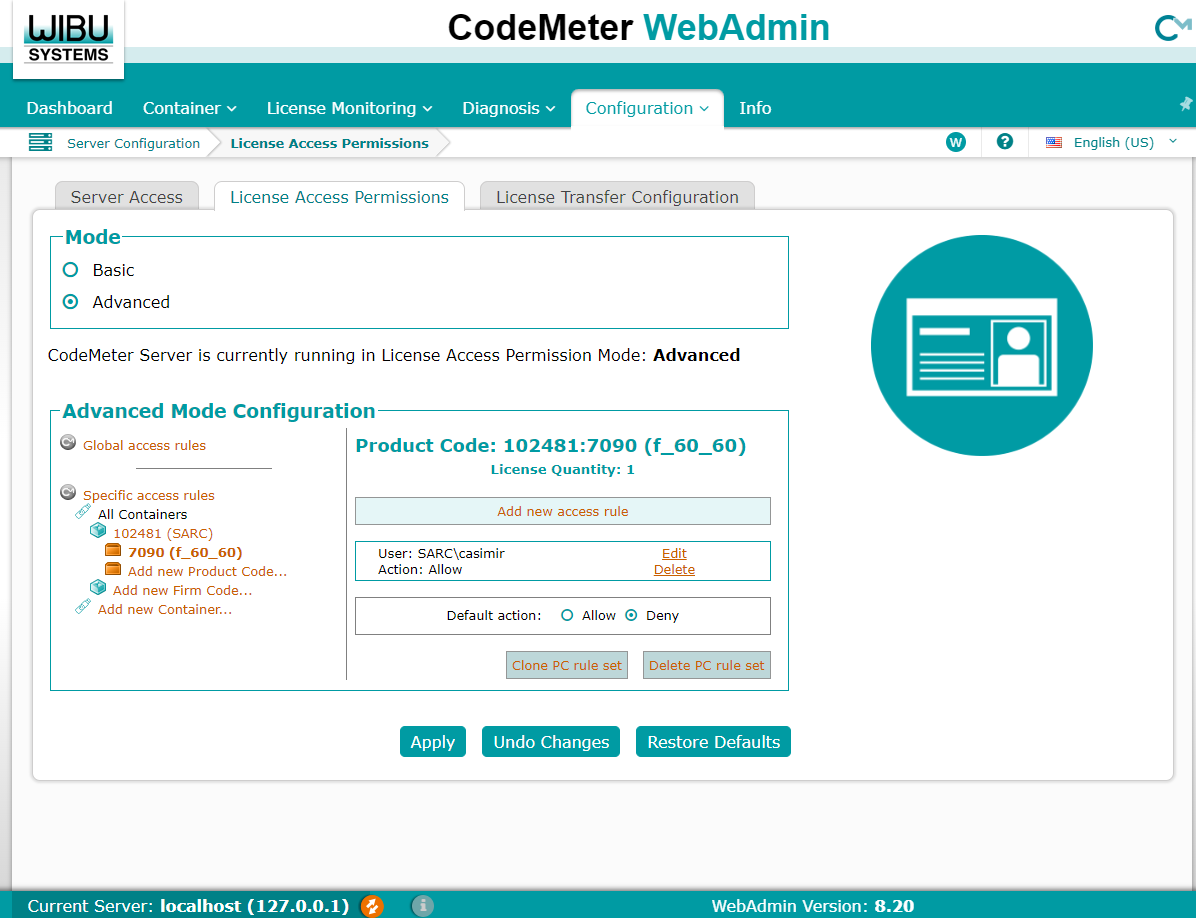
When this is an issue, the license access can be managed by use of the Codemeters WebAdmin. Access to a specific license can be arranged per user, Domain group, etc. by allowing or denying access. Below it is explained how this is done. The complete manual can be found online at Manuals & Guides page, under Manuals for Users , in CodeMeter Administrator Manual .
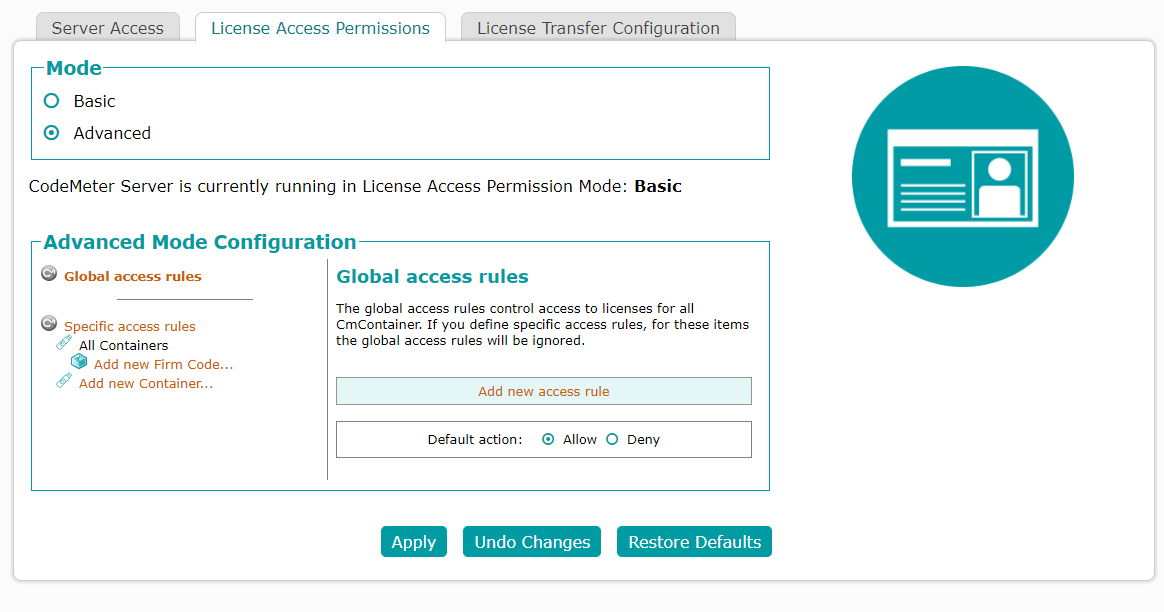
In order to create specific access rules to control license access to separate Product Codes, please proceed as follows:
Creating a Product Code-specific access rules requires a previously created Firm Code-specific access rules.
The dialog for selecting a Product Code displays.
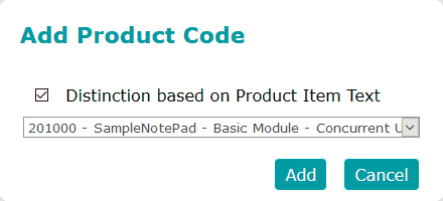
Checkbox "Distinction based on Product Item Text".
A new specific access rules valid for this Product Code displays in the right rule view. At the same time, the entry displays information on the License Quantity, i.e. the number of concurrent licenses on a network. This number is not to be exceeded, if later defining limits to the number of accesses.
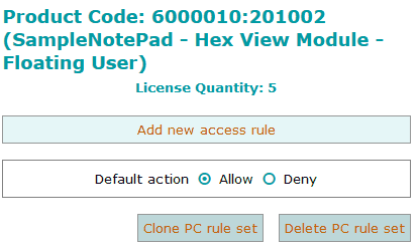
A dialog for defining a new rule displays.
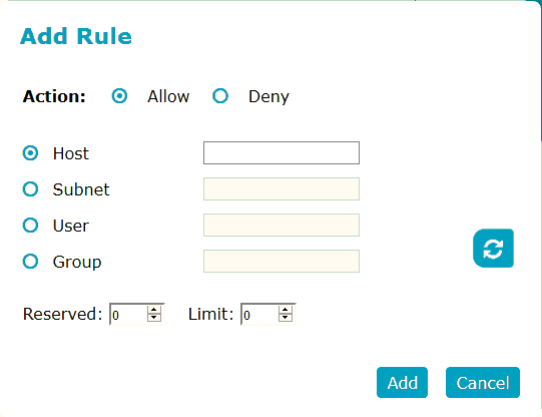
A click on the "Cancel" button cancels the process. The new rule displays in the right rule view.
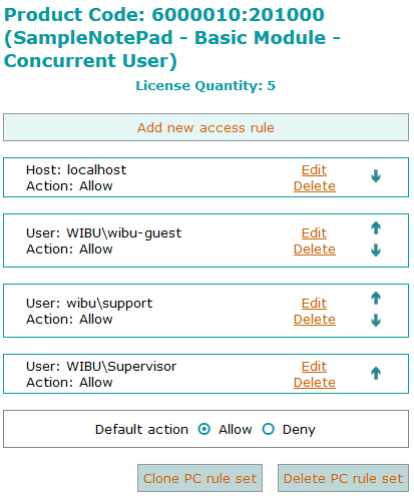
If you defined several rules, you may change the rule sequence by using the arrow symbols ↑ ↓. Rules are processed top-down, which means that the order of the rules is decisive for the result. Using the "Edit" or "Delete" link allows you to modify a completely delete a rule. In order to delete a complete Product Code-specific access rules use the "Delete rule list" button.
The figure below shows an example of a specific access rules with exclusive access rights (Reserved: 1; Limit: 1) to the Product Code 201000 of Firm Code 10 for a guest user, the complete support department and a Supervisor. 2 license accesses of a total of 5 license accesses (license quantity) remains available and the default license access is defined as allowed.
Updates from PIAS can be obtained in two ways:
Further distribution over your own computer network should be done by yourself. That will be standard procedure, however, if PIAS must be installed on many workstations that's always a chore. PIAS is able to do that automatically. At SARC a document can be obtained in which the modus operandi is discussed.
PIAS' help menu (see Help) includes two functions to request software creation date (compilation date) and version number (revision number). This can be used to determine whether it is time to download and install an update. For each user, a new version of PIAS is regularly created and set ready for download. So, this has a recent date and a version number, to which the following should be added:
When it is useful to actually install an update:
It stimulates a smooth operation of a digitizer if it would be equipped with function keys (or a similar feature), however, that is only seldom the case. So, they can be emulated by sticking a function key sticker on the digitizer, as depicted in the image below. You can print this sticker, stick it in the top right corner of the digitizer, and use it for digitizing commands. Please make sure to print teh sticker at the designated width of 27.5 mm. This can be achieved by using the sticker from the pdf manual, instead as those from the HTML or help reader versions. Alternatively, the sticker can be placed in the bottom left corner, in that case an additional setting is required, for which reference is made to Functions_digitizer_low in External variables.

In order to increase computation speed, in quite some occasions PIAS only will perform a computation if the data have been changed since the last one. E.g. a tank table in Layout is recalculated only when the tank (or hull) has really been changed. In order to assess whteher a recalculation is actually required, the definition time as well as the calculation time are stored, and compared if a new calculation is requested. To this end, it is of the utmost importance that your computer clock is functioning well and indicates the correct time, because data changes may otherwise remain unresolved.
Just like much other contemporary software, in the background PIAS makes use of temporary files. The use of these files will be unknown to the user unless there is a problem while creating or writing to these files. For example, if PIAS tries to create a such a file in a directory where the user is not allowed to create or write files. The directory location for temporary files is handled by the operating system, where Windows applies these rules:
When the manual mentions ASCII text files, it means a plain text file without control codes. A text file generated with a ‘normal’ word processor (such as MS-Word) frequently contains control codes for the purpose of formatting. To create a plain text file the word processor must be configured such that control codes are not added. An alternative option is editing ASCII files with a simple editor, such as Notepad or Notepad++ (for free).
An ASCII file can more or less only contain Anglo-saxon characters. In order to accommodate also characters from other scripts, internationally, the Unicode standard was developed. Unicode is also supported by PIAS in the static output, which is the output text as included in the program as such. A Unicode file, can be edited with Unicode text editors. A plethora of Unicode editors is available, at SARC we use the free Babelpad. Using Unicode in input data of PIAS, such as names of tanks or loading conditions, is a subject of future development.
XML is an international data exchange standard. Not primarily from drawing or product information, but in general for structured data collections (“data bases”). In a sense XML is an empty shell, which can be filled for a particular application. Such content has a meaning for the reader and writer of such a file, where the meaning is given by terms, which are called markup in XML parlance. These terms are free to choose, and must be defined somewhere, in a dictionary, preferably including meaning and units. A nicety of XML is that in general quite expressive terms can be chosen, e.g. longitudinal_centre_of_flotation_from_aft_perpendicular, which does not really require a dictionary to grasp its meaning.
For data exchange, XML is the preferred standard within PIAS, so that it will gradually be implemented in ever more places. There is already a large list of keywords for this which typically relate to ship design. These are summarised in the document “SARC XML dictionary on ship design data and commands” which is available on request from SARC (including a number of sample XML files).
It should be borne in mind that not every input or output parameter of PIAS has an XML counterpart. It would be a serious task to implement that, and who is going to use it all? That's why PIAS is currently equipped with XML support that was most in demand, such as XML output from Loading and Hydrotables, and two-way traffic (input and output) in Layout and Hulldef. Furthermore, XML support is added on demand, i.e. that specific XML functionality can be included in PIAS at the specific request of a user, against payment of the development costs, or sometimes a part thereof.
At the moment, a PIAS basic rule for reading an XML file is that it will replace any existing data of that ship or project in its entirety. Reading such a file is really focused on the once-only import of all ship data, and not on incremental or interactive import. For such applications, something could be suggested or conceptualized, but there will first have to be context and scenarios before this could be put into practice in a generally usable way. At the time of writing (2018), however, a project is under development which focuses on interactive cooperation between various computer programs, notably between CADMATIC and PIAS. This system also works on the basis of XML, but that is communicated directly over the network, so that there is no question of an XML file. Anyway, this is beyond the XML file functionality available for the standard version of PIAS.
The output PIAS can be done in different languages. All these output texts are included in separate text files, often named programname.txt (eg. Hydrotables.txt with the Hydrotables module). Such a file is a Unicode text file, please refer to the Unicode discussion just above. Each such a language file contains many text blocks, with in each block one line of PIAS output in multiple languages. At the file start a counter is included which represents the number of supported languages for that file. Subsequently, a block with language coding, e.g. nl for Dutch and en for English, according the ISO-639 standard.
In cooperation with SARC, each PIAS user is in principle free to add languages using these files, according to this procedure:
With external variables PIAS can be configured. Either for a particular option, or for an exotic switch that found to place in a regular menu. It must be considered that the application of external variables is an exception, only intended for specific options or limited to a small number of users. A regular user should not specifically need to apply them. An external variable consists of an argument (= the variable name) and a value. There are four alternative ways to specify an external variable:
Piasmenu PIASmailserver=xyz.A characteristic of our naval architectural profession is that we often encounter intensive calculation tasks. Although the computer serves us well in this area for decades already, the processing time may still be a bottleneck, also because man has adapted himself to the increased processing power, and demands more extended calculations than without the computer would have been the case. This mechanism also manifests itself with PIAS, so it is worthwhile to strive for an optimized calculation process. Processors of modern PC’s offer more and more cores. In order to squeeze as much power as possible out of the computer, PIAS and LOCOPIAS are increasingly distributing their tasks into multiple threads. For that purpose, PIAS has been equipped with three speed-enhancing packages, named PIAS /ES, where ES is an acronym of Enhanced Speed, Dualthreading, Octothreading and Viginitythreading.
This option, which was implemented in PIAS around 2005, uses the processor technology that became generally available in that period. For a long time past a PC generally had one processor, while this processor contains one core. That implies that the computer can process one task at a time (although the operating system may fool you, and give the impression that multiple tasks are processed simultaneously). However, there is a tendency where a computer is equipped with multiple real or virtual processors (which are multi-processor and multi-core machines respectively). So, this technology enables a program to execute tasks parallel, but the software will have to be adapted for that facility, where tasks which are suitable for simultaneous processing are explicitly offered to the processor for parallel processing. That implies that for every function of a software package it must be considered whether or not it is suitable for parallel processing, and it must be adapted accordingly, if appropriate. Limiting ourselves to PIAS, many tasks can be recognized which can be processed parallel, such as calculating damage stability for multiple angles of inclination, or drawing hull lines with Fairway. On the other hand, there are also jobs which are not suitable, such as the calculation of intermediate stages of flooding, where at first the final stage must be determined, whereupon the water level which corresponds to the filling percentage can be calculated. The following subjects have been implemented:
In the previous paragraph it has been discussed why and how PIAS was enhanced to use two processors (or cores) simultaneously for her computation-intensive tasks. In subsequent years, computers were provided with an increasing number of cores, so it seems obvious to apply more than two of them concurrently. Unfortunately, the 2005 solution was not scalable; Microsoft has come to the conclusion that the original Windows multithreading facilities themselves had a significant overhead (which is correct, we also observed a serious performance penalty), and rather than improve their efficiency, in good-old Microsoft tradition they replaced these with something different, the so-called thread pools. Around 2015 PIAS has been extended to use such pools, so that more than two cores can now be used in parallel. A further discussion on this subject is available in this white paper. In theory that could be quite a number of cores, however, in practice all kinds of considerations and choice must be made, which depend upon the calculation task and the overhead time of starting a separated thread (which is still not zero unfortunately, even when using pools). Therefore, the maximum number of concurrent threads has been set to eight, hence the name octothreading.
Octothreading is applied in a number of core algorithms in PIAS, which will be increased in the course of time. Incidentally, multithreading can only be applied in algorithms that are inherently capable to be parallelized, from which PIAS contains quite a number. However, some tasks are sequential in nature and thus cannot be multithreaded. This means that the implementation in PIAS must be considered case by case, there is no magic stick which will distribute the tasks of a program such as PIAS over all processors.
As described in the previous paragraph, PIAS was adapted around 2015 so that more than two calculation cores can be used in parallel. In view of the overhead time involved in starting up a separate calculation task, a maximum of 8 simultaneous calculation tasks was chosen at the time. Meanwhile, multithreading has been implemented in even more places within the PIAS for lengthy and compute-intensive tasks such as:
The last few years multi-core computers have become widely available and there are now PC‘s available for the common user which have ten or more cores, where hyperthreading allows twenty or more threads to run simultaneously. Especially with time consuming calculation tasks, such as the ones mentioned above, the overhead time hardly plays a role and one can gain a considerable amount of time by calculating with more than 8 threads. Therefore, the maximum number of parallel processes within PIAS has been increased from eight (octothreading) to twenty. We have called this vigintithreading.
While developing octothreading, every option was used to maximize the computing speed of PIAS. Contemporary processors have facilities for simultaneously running multiple floating point operations — which are relatively time-consuming, so where it would be advantageous to do a number of them at the same time if the computation algorithm allows. Intel baptized these facilities AVX2. Both the octothreading and vigintithreading version of PIAS utilizes deep in her computation core AVX2 as much as possible.
Finally, there is an additional feature for when you just do not want all processors to be taken into use by PIAS, for example, if one wants to use the computer simultaneously for other processor-intensive tasks. This can be set with ‘Maximum number of PIAS processors’ as discussed in Program setup.
To give the user a clear insight in the use of multiple threads, especially in time consuming calculations and in combination with vigintithreading, PIAS has been extended with a thread monitoring interface. This interface is visible during the calculations and shows relevant information per thread, such as: information about the status, i.e. a description of the current task of the thread, start time and elapsed time. However this thread monitoring interface was developed together with the implementation of vigintithreading, it is now available where implemented in PIAS, also for single-, dual- and octothreading.
When a thread is finished with a calculation task, the application assigns it a new calculation task. Until there are no more calculation tasks. The image shows an example of a calculation in its last minutes, with some threads already "finished". So there are no more calculation tasks available, the calculation is coming to an end.
